Alright, I'm pretty sure I've got it.
I'm going to use a brightly colored climbing accessory cord so I can show you more clearly. Elleth was on the right track, but that guide doesn't quite form a functional knot...a few specifics in the over-under sequence have to be addressed. Problem is, that drawing someone else made wasn't entirely accurate to begin with...it results in there being 1 tuck missing, and the knot won't hold when pulled towards center in the way intended here.
What we have is a variant on the anchor bend that has been opened up and (I believe) stitched in place to form that decorative '8'. I also believe that the tail end
may pass through the jerkin to a stopper knot on the backside, but this would create discomfort and bulbous points behind the knots, which would show as gaps between the jerkin and tunic underneath in those pics you posted, which we don't see. SO, I believe the tail butts up against the jerkin, and is discretely stitched in place.
As for the knot, I'm working off this one:

That loop (or 'bight') in the center, running horizontally, is what it's all based around, so we'll start by forming one of those.
Follow the looping pattern here, and then snug it all down...not tight, but snug so it looks as shown.
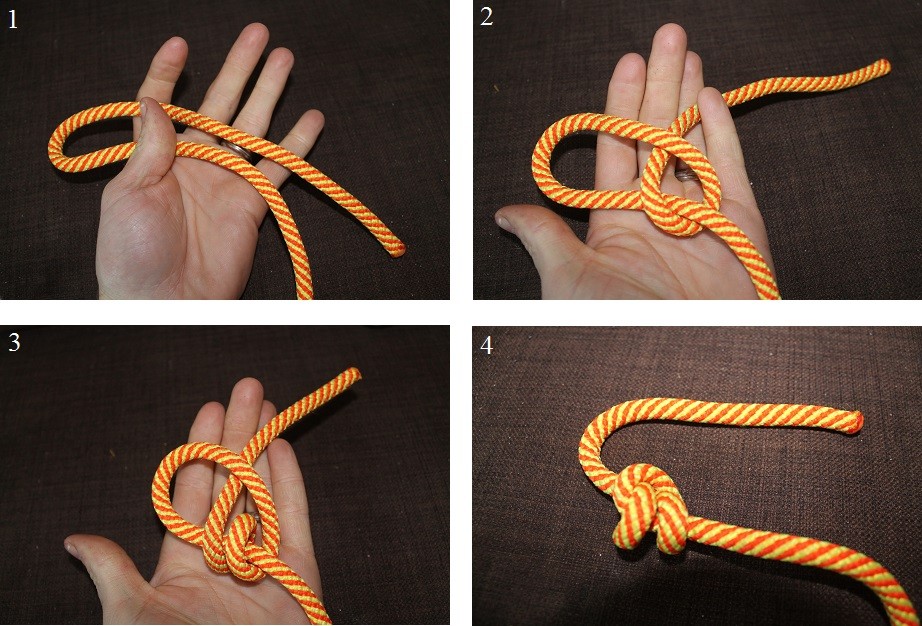
Now, if you look at the lower portion, you'll see these two wraps. Take your thumbs and pull them apart from each other, and your knot will take on this figure-8 appearance. Take a few moments to 'dress' the knot, taking out excess slack and generally making it pretty. In the last photo, you'll see what you'll need to cut off. Run stitching through all four 'corners' (meaning top left, bottom left, top right, bottom right) of the figure eight as well as both tails to hold it all together firmly (and to keep it from collapsing out of the fig-8 shape) and stitch the knot down on the jerkin. Your thread will run vertically through the knot, top to bottom as seen in fig 7, and can come out the back to attach to the leather. You'll have to tie a second batch of these in a mirror image so that the tail that comes out the side (rather than the back) is on the correct side for the other half of the jerkin.

Hope that's helpful.


