Page 1 of 2
Salt box
Posted: Wed Nov 13, 2013 9:49 pm
by Grimble Grumble
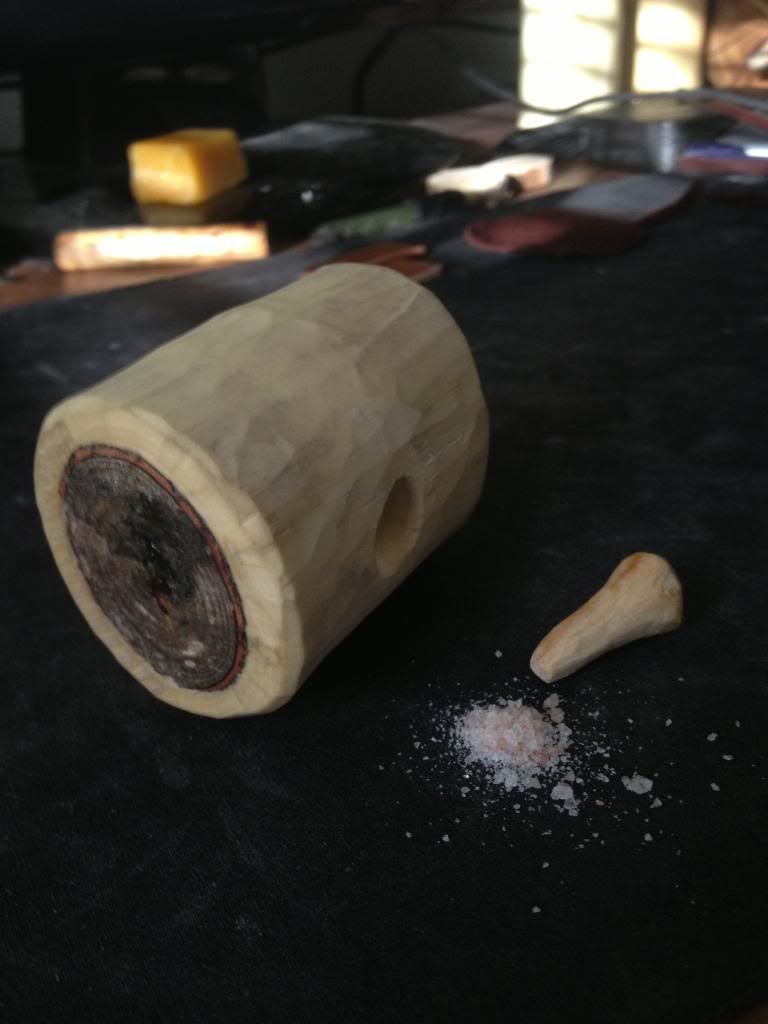
Shrink pot salt container.
Cut a green branch and hollow it out. Plug each side with discs of dried wood. Becomes airtight as the green wood tube dries.
Re: Salt box
Posted: Wed Nov 13, 2013 10:25 pm
by Addreonynn
I saw mugs done like this online b4 and want to do it, but i don't think i'd have the patience! how long did it take to dry completely?
Re: Salt box
Posted: Wed Nov 13, 2013 11:14 pm
by Straelbora
Cool idea. I'll have to try this some day. What's the diameter of the one pictured?
Re: Salt box
Posted: Thu Nov 14, 2013 5:50 am
by Laothain
That's a really good idea!
Re: Salt box
Posted: Thu Nov 14, 2013 9:23 am
by Grimble Grumble
Has a diameter of 1.6 inches. Length of 2 inches. Actual wall thickness of <0.25 inches Takes only a couple days to dry at this thickness.
Re: Salt box
Posted: Thu Nov 14, 2013 1:07 pm
by Straelbora
Grimble Grumble wrote:Has a diameter of 1.6 inches. Length of 2 inches. Actual wall thickness of <0.25 inches Takes only a couple days to dry at this thickness.
Thanks. I guess I need to find and cut some end plugs, then find the right sized green branch and give it a shot.
Re: Salt box
Posted: Thu Nov 14, 2013 3:47 pm
by Ringulf
That does look cool, most likely has many other applications too! Perhaps it is time to retire the old two sided bamboo salt and pepper shaker I am toting around and make a spice rack! lol!

Re: Salt box
Posted: Thu Nov 14, 2013 5:11 pm
by Manveruon
Very very cool. I may just have to try and make a mug like this.
Re: Salt box
Posted: Thu Nov 14, 2013 7:50 pm
by Ringulf
I wonder if you would have to make the mug with a bottom and top plug and then chew out the top once it was dried so the shrinking would be more or less even?
I suppose if you did not the top might be a bit smaller than the bottom (which would still be cool as long as it did not make it crack).
Re: Salt box
Posted: Fri Nov 15, 2013 12:27 am
by robinhoodsghost
Always need salt....great idea!
Re: Salt box
Posted: Fri Nov 15, 2013 1:10 am
by Grimble Grumble
I have made several cups in this way. One must take care to not have the plug too tight or it can cause it to split as it dries. The distance that it shrinks is very small so it is not necessary to plug both sides of a cup to maintain evenness.
I can make a shot glass sized cup in just a few minutes by using a scotch-eyed auger to bore out the tube.
Re: Salt box
Posted: Thu Oct 16, 2014 4:21 pm
by Arbellason
Got the wood needed for this so I'm going to make a few of them a little bigger. 2-3 for salt/spices 2-3 for herbs for wounds and maybe one lined with bees wax for a vial for a oil extract.
Re: Salt box
Posted: Thu Oct 16, 2014 11:55 pm
by Arbellason
Here is my half hour of woodwork for the day.
Dimensions
3 3/8" by 1 1/16"
holds a nice palmfull of salt and more is coming out as I put the salt in when the wood was still drying

without noticing it so add a few pinches more.
Re: Salt box
Posted: Sat Oct 18, 2014 12:34 am
by Stormraven
Great idea and a great way to put my auger bit to work!
Re: Salt box
Posted: Thu Mar 10, 2016 3:09 pm
by RikJohnson
with all this talk about salt and how the Hobbits carried it because it was so precious, I decided to make my own salt box.
Earlier I had purchased fro mthe swap meet a box of antler pieces. The guy had kept the tips and chopped the rest into various lengths and sold me the box for $10 which has been a source of projects since.


I capped both ends with a piece of wood i shaped to the antler. Then drilled a couple holes in sme projections for a cord.
***
Years ago I made this on a lark:

Then, when done with the salt box, I got some steel and brass wire and made a bunch of smaller pins similar to the cloak pin I made but only an inch or two across for smaller things like 'buttons'.


I got the original idea while playing around with some paper clips and instead of working, I made a bunch of straight pins for my sewing kit and the earlier versions of the above smaller pins.
that curved thing at the top is a fish rib I made into a needle and there is an elastic band at the bottom for scale.
