Penobscot bow build

A lot of reenactment level work is about learning appropriate historical crafts and skills. This board is for all general skills that don't have their own forum.

Moderators: caedmon, Greg

User avatar
ineffableone
Silent Watcher over the Peaceful Lands
Posts: 287
Joined: Mon May 05, 2014 9:29 pm
Location: Back in the Pac Northwet

Penobscot bow build

Post by ineffableone »

So a little history.

Cable-backed bow http://en.wikipedia.org/wiki/Cable-backed_bow
One variety of cable-backed bow is the Penobscot bow or Wabenaki bow, invented by Frank Loring (Chief Big Thunder) about 1900.[1] It consists of a small bow attached by cables on the back of a larger main bow.
Being that is wiki, I am not sure about the accuracy of that statement. There are unverified claims online that I have come across that say there is history of these bows going back into at least the 1500's. I don't know and really it doesn't matter to me. The bow design is just awesome, it is like a primitive compound bow. It is something different eye catching and unique, something I like in my weapons.

I first became aware of this style bow from the Canadian TV show Crusoe. The character who played Friday used a Penobscot inspired bow.

Image

Image

I really fell in love with this style, however quickly found there were very few bow makers offering this style in any commercial sense. The pool of choices was extremely limited, and the pricing well most of the prices were not in my budget. The one good thing, all the Penobscot type bows I did find were all very decent to high quality. So at least there was no junk versions of the bow I could find. Well except maybe the PVC ones, but I just ignore PVC bows n general so don't count those.

White Wolf Archery
Image

Krackow Company
Image

Both of the above are over $1000 for the bows, not really my price range for a bow.

Rudder Bows
Image

This was getting reasonable, but it was still in the $300+ range depending on which seller you buy from. However they did also offer a Penobscot bow kit a little over $100. Which really appealed to me, since the Rudder bows Penobscot was kinda plain. But with a kit, I could mod it a bit and make it my own.

This review of the Rudderbows Penobscot really sealed the deal for me http://peteward.com/test.penobscot.html

A few years went by, too many other items that were more important to purchase kept taking my money.

Finally I decided it was time to order the Penobscot bow kit. You can't order direct from Rudder bows, you have to find a shop who sells their stuff. I had Crow's Head bookmarked as the best deal for these bows, and for the kits. They are a decently known archery supply shop and one I knew I could trust. So I go on their site, and the bow kit is not there! I look more and the built bow isn't either. Ack!! I was too late. No. Panic sets in.

I frantically search around online and no one else has the kits and only Kult of Athena was selling the built bows. I emailed Crow's Head asking if the had stopped carrying the bow kit or if it was just out of stock. I am desperate now fearing Rudder Bows might have discontinued the Penobscot bow. I get a response the same night. "Yes we still carry the kits, sorry it isn't on the site, it will be posted back up soon, thanks for letting us know it wasn't there." or something to that effect. Next day it was back on the site and I put my order in. Bonus, the price had gone down a bit from the previous listing. Maybe $10 or so less than before, and the built bows were now less also.

So I patiently waited, or at least tried to patiently wait. Maybe a week goes by, and then I was notified the bow had shipped. Just the other side of the state from me. So fairly quickly I received my Penobscot bow kit.

The basic kit unpacked from the box. (Includes, main bow, upper bow, upper bow strings, tillering stick (cling wrap removed so you could see it), scraper (cling wrap removed), main bow string/tillering string/nstructions (all wrapped in one tight small package)

Image

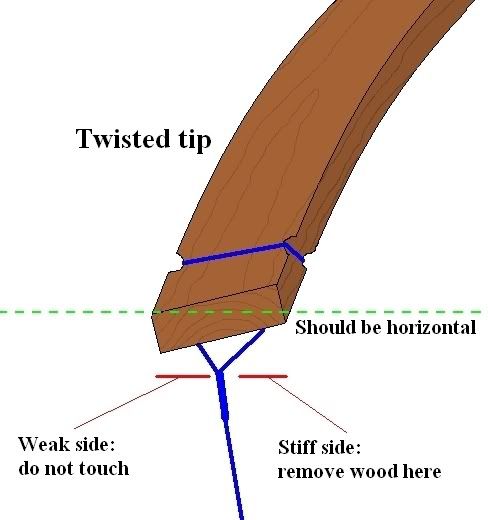
Worth noting the instructions are generic longbow tillering instructions. Nothing pertaining to the special construction of a Penobscot bow. Nothing about how to attach the two bows. Nothing about the string grooves needing to allow strings in both directions. But it is ok, I am not completely clueless, and the lack of specific instructions isn't a hindrance to me. Though I would have been curious to find out what the instructions might have said if there was specific instructions.

Some assembly is required (the screw that came with the kit was too short to hold the tillering stick, so I grabbed my own and used that)
Image

Tillering stick assembled and items laid out
Image

The upper bow is already tillered, and need no work from me other than finishing it and attaching it to the main bow.

The main bow is a rough floor tiller. Meaning they roughed out the shape enough to get it to bend slightly when pushed on with the tip on the floor.

Hard to really show the roughness of the main bow but I tried.

Image

If it looks like it is bent, it is just an optical illusion from the camera angle, freaked me out seeing this picture and I spent about 15 minutes after taking it to make sure there was no bend.
Image

Part of me wanting the kit rather than a prebuilt bow is I want to make a few modifications. Mainly to build up the handle with some other woods, and to build up the bow nocks so I can safely use a Fast Fight string. Well and reinforced bow nocks just add a little extra flare to a bow too.

Image

I picked up some 1/4" Wenge the darker wood (probably can't tell but there is some stripping pattern in this), and some 1/8" Zebrawood the lighter stripped wood.

I cut the strips and this is a dry fit of how I plan to place them.
Image

Though I am considering going back and getting a little more Wenge to add one more piece in the middle sanwiching the Zebrawood between two Wenge pieces. I don't need to decide right away, it is something that I don't need to worry about till after I finish tillering the main bow.

Today was mainly just gluing the Wenge and Zebrawood pieces together.

Add plenty of glue, I am using Titebond 3 (water "proof" wood glue, I treat it as a good water resistant glue)
Image

(Note the smaller pieces are going to be used to reinforce the bow nocks)

smooth glue over entire surface of the two pieces to be glued together
Image

put together, and I wrapped with painters blue tape to help keep the glue from getting too messy and to keep them from slipping apart
Image

Added some clamps to keep the pieces together tight, but not too tight to push all the glue out of the joint
Image

Nope not done, more clamps, yes there is some wood under there somewhere being clamped.
Image

Now those have to sit and dry. Instructions say 4 hours, but I will leave over night.

Now that is done. What else can I do? Well there is this bow that needs working on.

Seems the tillering stick has more of a gap than the bow is wide. Thankfully with the wood piece used to cover the scrapper's blade the bow fits in with out too much wiggle. (see the piece sticking out a bit, that shimmed it up nice)
Image

Time to exercise the bow limbs
First stretch of the limbs, not getting too far.
Image

Keep flexing the limbs, over and over and over and over......wheeew. 20 stretches later.

Image

I will do a bit more stretching of the limbs over the night. But that is enough for today. The floor tiller looks pretty good, fairly even flex, and symmetrical. Look like I don't have to worry about correcting too much unless I put it in there.

Next I will start on scraping the limbs and tillering as far as I can get to. As well as checking on the glued wood and hopefully having them nice and well glued together.

Thanks for following along. If I don't get to tillering tomorrow, I have a Ham Radio class Fri-Sun, so I might not get to do much bow work over the weekend.
Image
User avatar
ineffableone
Silent Watcher over the Peaceful Lands
Posts: 287
Joined: Mon May 05, 2014 9:29 pm
Location: Back in the Pac Northwet

Re: Penobscot bow build

Post by ineffableone »

More bow building.

Unwrapped and unclamped the Wenge and Zebrawood I did yesterday. Plenty of extra glue on the pieces. So I scrapped off the excess then sanded off what scraping couldn't get.

Image

I went ahead and got more Wenge to add to the center handle section. Cut a piece to length and here is the dry fit.

Image

After I decided I liked it, glued it up.

Image

Now for the fun part. Setting up to start scraping the limbs.

Image

Taking long strokes with the scraper, as far out to the nocks as I can get. When I get closer to the proper draw weight/tiller I will scrape unstrung just down at the nocks.

Image

Your supposed to count and do even numbers of scrapes on each side. But I just scrape till it feels good to me, then switch to the other limb. So far it has been fine for me this way.

Image

After going back and forth 4 times, making sure to keep the limb belly rounded and even. I took the bow down, exercised the limbs. Every time you remove wood you need to exercise the limbs. I gave it 20-30 good pulls then checked the tiller.

Image

Looking pretty good, not bending too much yet, but better than the floor tiller. No major trouble spots so back to scrapping. I gave each limb plenty of scraping, getting some great curls shaving off. Who needs to make feather sticks, make a bow and you will have plenty of fire tinder.

Image

After going back and forth scraping each limb for awhile, time to check the tiller again.

Image

Much more bending, starting to see some stiff spots now. On both limbs out near the the nocks needs some work, and up near the handle. Over all though pretty happy. But time to quit for the day. Hopefully I will get to do some more tomorrow before my Ham license class.
Image
User avatar
ineffableone
Silent Watcher over the Peaceful Lands
Posts: 287
Joined: Mon May 05, 2014 9:29 pm
Location: Back in the Pac Northwet

Re: Penobscot bow build

Post by ineffableone »

On this episode of the Penobscot bow build,


I sanded down the Wenge and Zebrawood handle additions

Image

Image

here are some dry fits to show placement

Image

Image

Image

Also cut the nock overlays, I plan on doing all 4 bow nocks. While the helper bow doesn't need them, it will look weird I think with them only on the main bow.

Image

BTW on a side note, Wenge is a great smelling wood. It has a chocolatey smell to it. With maybe a little hint of coffee mixed in. Make it a pleasure to sand and cut.

Unstrung I scraped the limb tips down a bit where the tillering string made it difficult to scrape. I didn't want them to get too thick and have a lot to do later when finishing up.

Image

While there I went ahead and did some more scraping on the limbs, but purposely did it uneven. I wanted to show what uneven tillered limbs look like for folks who read this who might not have a lot of experience, or who might have more difficult wood to work with. If all you see is limbs fairly close in tiller it is hard to learn what to look for. This added a little extra work for me to even it out after but I figure it is worth a little extra work if it helps others.

Image

You can see the left side is bending more, the right side is a lot stiffer, and not bent as far. If your tillering and get this, you want to leave the limb that is bending more, and only work on the other limb till you get it evened out. It doesn't have to be perfectly matched, but as long as it is reasonably close to bending similar.

After evening the limbs back out I gave the bow the first draw weight check (sorry forgot to take photos of this). I still haven't moved to a regular string with a proper brace height, this is measured using the tillering string that had no brace height so this is very rough draw weight. I got 52# @ 24". So I still have a good ways to go for a 50# @ 28 ", but it was good to start checking and see where I was.

I did some more scraping, while not completely even they were close enough to give another check.

Image

I also did a quick draw weight check to see how much the draw weight had changed. Still using the tillering string and no brace height I got 50# @ 26". So I am getting pretty close and need to start slowing down and keeping everything really even and doing only small amounts of scraping and then checking then scraping. That will wait for another day though.

This is a good place to stop, I don't want to rush any of this part. Next I will likely be using a real string and trying to get close to a real brace height, so I can get a much more accurate idea of the draw weight.
Image
User avatar
ineffableone
Silent Watcher over the Peaceful Lands
Posts: 287
Joined: Mon May 05, 2014 9:29 pm
Location: Back in the Pac Northwet

Re: Penobscot bow build

Post by ineffableone »

Getting closer to the end

Time to do a little work on the helper bow, which had been kinda getting left out except being used to top the main bow in the tillering stick so I could clamp it upside down to scrap.

Laying out the outer handle slab and the nock overlays on the helper bow

Image

Gluing them in place

Image

Image

Also did some work on the center handle section. I had sanded the ends down convex, but wanted them to be concave.

before
Image

after (sorry for the blurry image, you will see it better when I attach the bows together)
Image

Also did some more tillering and working the tips a bit more to keep them from being overly bulky.

Image

I figured out I didn't need to make a graph background, I could just use the pavers on the ground.

Same tiller, pic taken with and without overhead lights

Image

Image

Notice that it no longer has the white tillering string, but now has the actual bow string on it. Had it at a nice fist and thumb brace height. This means I am getting pretty close to the finish. Time to check the draw weight.

I forgot to take a picture of this step last time. So here is the procedure. Place it on a bathroom scale, zero out the scale with tillering stick and bow hanging from it's string on it. Then start pulling the bow down the tillering stick going no further than your desired draw. Since my tillering stick pretty much bottoms out at 28" wasn't much of a chance to go too far. And thankfully I have a 28" draw.

Here is what the bow looks like on the tillering stick on the scale.

Image

And what was the result? 54# @ 28"

Yay!! That is just about perfect. Since I still need to sand the bow, and that will lower the poundage. And when I add a finish that too will lower the poundage, time to stop tillering.

Next steps are to sand it down, attach the nock overlays to the main bow, and the handle slabs. Wait for glue to dry, then shape the nocks. Then attach the main bow and the helper bow and then shape the handle. Then finally apply a the finish and test firing Though I guess I could test fire before the finish. I would say 2-3 more days. And only that long because gluing and finishing needs drying time.
Image
User avatar
ineffableone
Silent Watcher over the Peaceful Lands
Posts: 287
Joined: Mon May 05, 2014 9:29 pm
Location: Back in the Pac Northwet

Re: Penobscot bow build

Post by ineffableone »

Well today was all about sanding and gluing.

Sanded down the helper bow's handle section to round the edges a bit.

Image

Also rough sanded the nock overlays on the helper bow

Image

As well as using a file to smooth the transition between the parts

Image

Then I gave the helper bow limbs a nice sanding. Starting with 120 grit going up to 600

Image

Then moved on to the main bow doing the same, 120 up to 600 grit

Image

Now it was time to get the main bow prepped. First I needed to sand the riser/handle sections to make sure there was a nice flat to mate with the bow.

Image

Then is was glue time.

Image

Image

Image

I intentionally did not connect the bows yet, as having them separate will let me work the nock overlays much easier. Just a couple more days before this bow is put together and looking like it should. After I had sanded the bow down, I did check the draw weight, and was still getting a 54# @ 28" So I am not loosing too much draw weight from sanding. Which is making me consider going back and giving it just a little more scraping. to get down to 50#. Because I have the helper bow, I can use that to tune up to 60#. Not sure if I want to have it tune up to 64#. Will see as things progress. I am not overly worried about the extra 4 #.
Image
User avatar
ineffableone
Silent Watcher over the Peaceful Lands
Posts: 287
Joined: Mon May 05, 2014 9:29 pm
Location: Back in the Pac Northwet

Re: Penobscot bow build

Post by ineffableone »

Today was mostly a sanding day. Rather than talking a bunch of pictures of me sanding then sanding some more, then a bit more sanding. I just took pictures of it at the end, well the end of today. I still plan on doing more sanding, and shaping. This was just to get the general shape and sanding done.

Main bow nocks sanded and shaped, with the string groove shaped.

Image

helper bow nock sanded and shaped with sting groove shaped

Image

Did you notice something in that last picture?

Did you notice the helper bow was on the main bow?

I also glued the bows together

Image

It is finally looking like a Penobscot bow

Image

Image

Yay, looking pretty good I think. I still have to drill some holes in the handle and glue some walnut dowels into the handle. For a little extra security as well as creating a little more interesting wood contrasting pattern. Then cut the shelf and glue some Wenge wood on the shelf. And shaping the grip of the handle. After that the only thing left will be to apply the finish and then wax the bow. Well and of course take it for a test shoot.

Getting really close to finished now, yay!!.
Image
User avatar
ineffableone
Silent Watcher over the Peaceful Lands
Posts: 287
Joined: Mon May 05, 2014 9:29 pm
Location: Back in the Pac Northwet

Re: Penobscot bow build

Post by ineffableone »

I decided to go ahead and tiller the bow down to 50# at 28" so did that now, before I went any further. Didn't take much and the bow feels quite good. I forgot to take pictures of this, but I imagine you all can figure out what it looked like since it is pretty much the same thing as the tillering before, just a little more curve now in the bow.

Next I started drilling holes for the Walnut wood dowels to be inserted into the handle. These aren't necessary but they will help add a little strength to the bow, and add a little extra decorative pattern to the wood.

Image

It was during this drilling that my first and hopefully last mistake happened. While drilling the second hole I went a little too fast at the end ans split out the Zebrawood lamination on the back of the handle section.

Image

While I would have preferred not to have done this, maybe it will be a happy accident as Bob Ross liked to say and result in something interesting when I shape the handle grip. At this point it really doesn't effect anything and the reality is that the laminations are just extra added strength for the handle and not overly needed anyways.

So I moved on drilled the third hole and glued up the walnut dowels

Image

Can't really really do much else while waiting for the glue to dry so this ended my bow building for the day. The accident today reminded me, not to rush. Keep my patience and do things right not fast.

Tomorrow is cutting the dowel ends off, cutting the shelf and sight window, rough handle shaping, and gluing a Wenge wood piece into the shelf. I could skip the Wenge wood shelf and it would speed up the build and make it so I could shoot the bow sooner, but I think it will make for a nice accent so I plan to go ahead and do it.
Image
User avatar
ineffableone
Silent Watcher over the Peaceful Lands
Posts: 287
Joined: Mon May 05, 2014 9:29 pm
Location: Back in the Pac Northwet

Re: Penobscot bow build

Post by ineffableone »

Did a bit more work today.

Cut the Walnut dowels that I glued yesterday off.
Image

Cut the basic grip shape
Image

Test to make sure it could handle being strung
Image

Now the time consuming shaping the grip, shelf and sight window.

I cheated a bit and used my Work sharp with 80 grit belt to do the majority of grip shaping. Being it is a nice slack mini belt sander, I was able to get a lot of shaping done with it.

Filing the shelf into a radius
Image

Now the confusing part. How do you string a Penobscot bow? Pretty much like any other bow, but the loose string loop has to go over the upper string when you use the stringer.

Image

Taking my Penobscot bow out for a first test shot
Image

Image

Image

It was shooting nice, but a bit heavy. I tested the draw weight and it was pulling 65# @ 28. The helper bow had added 15# draw weight.

One problem the shelf is too long and hits the fletching.
Image

Back to work, reduced the shelf a bit.
Image

That is a bit better, the flecthing now fit fine.

I started sanding and sanding and sanding. Getting rid of glue. smoothing transitions between overlays and the bow limbs, rounding out any sharp edges.

Now I did the dumb thing. Because it was shooting so heavy, I thought I would shave off just a little more. Tiller the bow down to 40#. I strung it up without the helper bow. And when I pulled it to 22" on the tillering stick, SNAP!!
Image

I should have known better, I had removed a lot of material that was originally part of the main bow to shape the grip. So without the helper bow keeping the pressure distributed, the draw was too much.

*sigh* Those are the breaks. (pun intended)

At least I got to shoot it some before it broke. And I think I can salvage the helper bow and use it to try again. I will just need to order a Rudderbows longbow and attach the helper bow to it.
Image
User avatar
Peter Remling
Athel Dunedain
Posts: 3735
Joined: Sat Feb 16, 2008 4:20 am

Re: Penobscot bow build

Post by Peter Remling »

That is a shame, I was following the build. Your progress and photos were very informative. I thank you for sharing all of this and hopefully we'll see it's completion after you get the new kit.
User avatar
ineffableone
Silent Watcher over the Peaceful Lands
Posts: 287
Joined: Mon May 05, 2014 9:29 pm
Location: Back in the Pac Northwet

Re: Penobscot bow build

Post by ineffableone »

Peter Remling wrote:That is a shame, I was following the build. Your progress and photos were very informative. I thank you for sharing all of this and hopefully we'll see it's completion after you get the new kit.

Yep already ordered another kit from Crow's Head. This little glitch in the plan wont stop me.
Image
User avatar
Eothain
Silent Watcher over the Peaceful Lands
Posts: 273
Joined: Wed Sep 11, 2013 10:53 pm
Location: Glenwood, Iowa

Re: Penobscot bow build

Post by Eothain »

That is a huge bummer! Good to see you are bound and determined to see this through though! Hope to see it completed and working well soon, best of luck!
...in the end the Shadow was only a small and passing thing: there was light and high beauty for ever beyond its reach.
User avatar
ineffableone
Silent Watcher over the Peaceful Lands
Posts: 287
Joined: Mon May 05, 2014 9:29 pm
Location: Back in the Pac Northwet

Re: Penobscot bow build

Post by ineffableone »

Eothain wrote:That is a huge bummer! Good to see you are bound and determined to see this through though! Hope to see it completed and working well soon, best of luck!
Thanks. I will be continuing the build soon. I plan to get the wood laminations ahead of time and glue them up while I am waiting for the kit to get to me. That way the glue ups will end up taking less time from the main build.
Image
User avatar
ineffableone
Silent Watcher over the Peaceful Lands
Posts: 287
Joined: Mon May 05, 2014 9:29 pm
Location: Back in the Pac Northwet

Re: Penobscot bow build

Post by ineffableone »

FYI, I got the new kit and will be posting a continuation of the build soon.
Image
User avatar
ineffableone
Silent Watcher over the Peaceful Lands
Posts: 287
Joined: Mon May 05, 2014 9:29 pm
Location: Back in the Pac Northwet

Re: Penobscot bow build

Post by ineffableone »

OK rather than giving the step by step process I did previously, I am just giving highlights this time. Anyone new to this thread can review the previous info to learn how I tillered the bow

First, I had glued up the wood pieces early and found they had horrible gaps due to the Zebrawood having a twist to it.

Image

So I started redoing them making sure they were fully clamped together on all sides.

Image

Image

I am able to salvage some parts of the messed up pieces and will likely use them for the nock overlays. I already cut one and got enough for two overlays, and should be able to get two more out of the rest.

As for the bow itself. Well I am almost done. I took it with me camping Thurs night and worked on it Fri morning. Took me from 10 am to 1pm to go from the floor tillered it came as to a 45# bow. Amazing how fast it can go when there is little to no distraction, and your not trying to take progress pictures.

Image

Used the tillering string to check the nocks were level with each other since I didn't have a grid to check with.

Image

I am planning to go ahead and take it down to 40# in the next day or two. Which will give me a 50# bow with the helper bow. This will also give me the time to finish gluing up the Wenge and Zebrawood laminations and even attaching them to the helper bow ahead of attaching the main bow to the helper bow. I should have a functional bow by next weekend the latest, but more likely by the middle of the week.
Image
User avatar
ineffableone
Silent Watcher over the Peaceful Lands
Posts: 287
Joined: Mon May 05, 2014 9:29 pm
Location: Back in the Pac Northwet

Re: Penobscot bow build

Post by ineffableone »

Got a little bit more done on the bow.

Glued up the last lamination, the 3 piece part that goes between the helper and main bow.

Image

Sanded down the ends of the laminations that had finished being glued, so they are ready to meet up with the bow and get glued to it. It helps to sand the angle now since once glued to the bow you have to be careful of cutting into the grain of the bow.So getting nice tapered ends now saves a lot of stress latter.

Image

I also cut the 4 limb nock overlays. I will likely be gluing the limb nock overlays and the handle laminations to the helper bow tomorrow.

Started reducing the poundage and scraping the ends down so the ends weren't overly thick and stiff. Started this with it unstrung so I could access the nock areas easier.

Image

I then noticed that the limbs had a bit of twist to them when I did string it up to exercise the bow limbs.

From the top or back of the bow

Image

From the belly looking at the tips of the bow down the length.

Image

To solve this you have to scrape only the stiff side. I found this picture from paleoplanet that helps illustrate the concept

Image

So I pencil marked the areas where I needed the most work and scraped away.

Image

I have gotten the bow a lot less twisted, however I am down to 42# now, and don't want to get below 40# or if I have to only barely below 40#. So I have stopped so I can come back fresh rather than trying to get the last bit at the end of my stamina. One limb now has almost no noticeable twist, while the other still has a small amount that is still slightly noticeable. Tomorrow I will work on getting that twist out and hopefully stay at my wished for 40# draw weight.

Until I get the twist fixed, I wont be gluing any overlays or handle laminations to the main bow. The helper bow however I can glue tomorrow so that I have as much ready as I can for when the main bow is ready. Hopefully I can get the twist out tomorrow and at least glue the overlays on to the main bow.
Image
Post Reply