The making of a Dunedain Snapsack

A lot of reenactment level work is about learning appropriate historical crafts and skills. This board is for all general skills that don't have their own forum.

Moderators: caedmon, Greg

User avatar
Elleth
êphal ki-*raznahê
Posts: 2933
Joined: Wed Nov 03, 2010 5:26 am
Location: in the Angle; New England

The making of a Dunedain Snapsack

Post by Elleth »

Okay, let's make a snapsack!
merf-dunedain-snapsack-01-snapsack.jpg
merf-dunedain-snapsack-01-snapsack.jpg (46.09 KiB) Viewed 5477 times
The following is a pattern I've sort of evolved over the last few years. It's pretty simple in concept, but there's a few less than obvious things in the design that help it work as it's supposed to - 

- goatskin / calfskin is easy to treat against water, but can easily stretch out of shape. The lining fabric helps the bag keep its shape, and the skin keeps the contents dry. This means you want a somewhat sturdy linen. It doesn't need to be super-stiff (more on that in a bit) - about the weight you'd use for a trekking shirt should be fine. 
merf-dunedain-snapsack-02-cloth-lining.jpg
merf-dunedain-snapsack-02-cloth-lining.jpg (146.71 KiB) Viewed 5477 times
- similarly, the heavy linen stitching along the spine is taking a lot of the weight of the bag. Ideally, we loop the cord(s) over the d-rings in such a way the weight of the bag's contents is falling on the d-ring itself, not the stitching. 

- there's some spaces along the body where you can slip a cord or strap under the spine of the bag - this helps you keep everything tidy.
merf-dunedain-snapsack-03-lacing-spots.jpg
merf-dunedain-snapsack-03-lacing-spots.jpg (223.69 KiB) Viewed 5477 times
You want this to be loose enough most of the weight is still on the d-rings, but if you add a thicker panel to the underside of the bag along the spine for your stitching, you can cheat here a bit. Basically, whereever possible you want something other than the goat/calfskin of the bag shell actually taking the weight at the pressure points.
Last edited by Elleth on Fri Mar 03, 2023 6:58 pm, edited 1 time in total.
Persona: Aerlinneth, Dúnedain of Amon Lendel c. TA 3010.
User avatar
Elleth
êphal ki-*raznahê
Posts: 2933
Joined: Wed Nov 03, 2010 5:26 am
Location: in the Angle; New England

Re: The making of a Dunedain Snapsack

Post by Elleth »

Materials
    - 2-3oz goat or calfskin,
https://www.springfieldleather.com/Natu ... -Goat-Skin
https://www.springfieldleather.com/Calf ... ural-2-3oz
( calf might be a bit more "high class" in period, but either's entirely apropriate for most personas of Eriador I think. A barktanned deerskin might be even better for a ranger! )

~heavy linen or hemp thread for stitching the leather
(I used to use thread picked from linen canvas, but the canvas I like is no longer available.  Avoid modern chemically dyed linen thread if possible - it looks a bit too modern)

Wm Booth Draper recommends;
https://www.wmboothdraper.com/product/b ... ard-skein/
(also available on a spool, which is a *lot* less bother. If you get a skein, wind it onto a spool or stick or something as soon as you get it, or you'll have a tangled mess)
"Crawford Waxed Linen Thread 4 ply" in a natural color is also good, though more expensive. 


 - 6-8 oz hemp or linen for lining
https://www.wmboothdraper.com/product/u ... n-wlg-100/
(I don't see my favorite utility linen there any more, but this is close)


~ sewing thread for stitching the lining (I use 35/2 unbleached linen for this)
https://www.wmboothdraper.com/product/3 ... en-thread/

    - 14-16 oz hemp or linen canvas for reinforcement
https://www.wmboothdraper.com/product/c ... n-wlg-101/
(again, my favorite's gone, but this is close)

This 16.5oz hemp canvas is also a good option, it's very good for utility packs in its own right, and it picks into good heavy sewing thread as well. Good stuff!
https://www.hemptraders.com/CT-C18-p/ct-c18.htm

    - 2 d-rings of ~3/4-1" inner diameter
            I generally use Shapeways castings for my rings, but even cheap d-rings from the hobby store should be just fine - though do look for once-piece castings or welded wire if you go that route, and you might want to rough them up a bit on an anvil so they don't look so modern. 

These are mine:
            for larger size (~9-12" diameter bag, like you might carry on a shoulder strap):
                https://www.shapeways.com/product/AX7LBD4N9/
            for smaller size (~4-5" diameter bag, like you might want on a belt or quiver strap):
                https://www.shapeways.com/product/U89FZ49FQ/

... Another option I like is these inexpensive iron buckles, with the tongues snipped off:
            https://www.kultofathena.com/product/sm ... ng-buckle/

For that matter, any cast medievally buckle will do just fine, provided it's thick enough. A rangery pack with hardware improvised from old belts would be cool! You may also wish to find a chemical darkening agent to get rid of the shine. (for Shapeways stuff, I find their "bronze" colors much better than their "brass" - but I'm far from an expert in metalwork / metal finishing)
Persona: Aerlinneth, Dúnedain of Amon Lendel c. TA 3010.
User avatar
Elleth
êphal ki-*raznahê
Posts: 2933
Joined: Wed Nov 03, 2010 5:26 am
Location: in the Angle; New England

Re: The making of a Dunedain Snapsack

Post by Elleth »

Preparations

Step One - dye and treat your leather using your favored method. I've come to prefer calfskin w/prepared walnut dye, then treated with mink oil, as used in Eofor's birka wallet:
merf-dunedain-snapsack-04-commercial-walnut-dye-appearance.jpg
merf-dunedain-snapsack-04-commercial-walnut-dye-appearance.jpg (178.27 KiB) Viewed 5476 times
(The inner layer of this wallet got a coat or two of the commercial walnut dye, the outer layer two or three. The results are much more consistent, while still allowing the texture of the leather to show through)

Previously I used suntanned walnut powder and a dubbin of neatsfoot oil and beeswax. Either work, but there's a lot more control with the commercial version, and less risk of sunburning your leather. On the other hand, the commercial stuff has I think a bit of iron it which may degrade the leather over time. I've not used it long enough to know yet. You'll have to decide yourself.
merf-dunedain-snapsack-05-suntanned-walnut-powder-dye.jpg
merf-dunedain-snapsack-05-suntanned-walnut-powder-dye.jpg (191.01 KiB) Viewed 5476 times
(These four pieces were all done with the same technique - walnut powder and left in bright summer sun to tan - as you can see the results vary quite a bit by material and the amount of sun they got)

Step Two - dye your lining fabric and drawcords, if desired. I use walnut powder for this - a boil and then a soak overnight. For "rangery" things, I like the linen to be dark enough it doesn't flash overmuch in the woods, but light enough you can see what's coming in and out against the fabric. That's purely a matter of preference however - and linen doesn't naturally dye very dark in the first place, so we're a bit limited there I think.

Step Three - If you're using toggle cords, make those now. I file little divots in my toggles and re-oil them with plain flaxseed oil from the organic grocery section. This keeps the cords in their place a bit better. Note how we stitch the cords in place, stitch two (or four) widths alongside each other for a short "strap" then open it up again for a "buttonhole" for the toggle.
merf-dunedain-snapsack-06-cord-buttonhole.jpg
merf-dunedain-snapsack-06-cord-buttonhole.jpg (125.95 KiB) Viewed 5476 times
You'll probably want to finish your bag before you stitch that buttonhole closed - that way you know how long to make things. I also leave enough extra cordage for a couple more winds around the bag in case I want more security.
Persona: Aerlinneth, Dúnedain of Amon Lendel c. TA 3010.
User avatar
Elleth
êphal ki-*raznahê
Posts: 2933
Joined: Wed Nov 03, 2010 5:26 am
Location: in the Angle; New England

Re: The making of a Dunedain Snapsack

Post by Elleth »

Constructing the bag

Step One - Sizing
The size of your bag is going to vary depending on the role you have in mind and the size of your hide. As a point of reference, I've tended to settle on around ~8-9" diameter x 23-25" long for a larger pack, and ~6" x 24" for a little utility one as is on my quiver strap. Piecing to get up to the size you need isn't difficult, and is a practice with a long bit of history!  I kind of like how it looks as well - very appropriate for a materials-poor culture like we're reenacting. Just use the same technique as you use on the main bag seam to get up to the size you need, then press flat as you can and cut to size. (press flat with fingers or a seam rubber of course - don't burn your leather!)
merf-dunedain-snapsack-07-pieced-leather.jpg
merf-dunedain-snapsack-07-pieced-leather.jpg (137.81 KiB) Viewed 5476 times
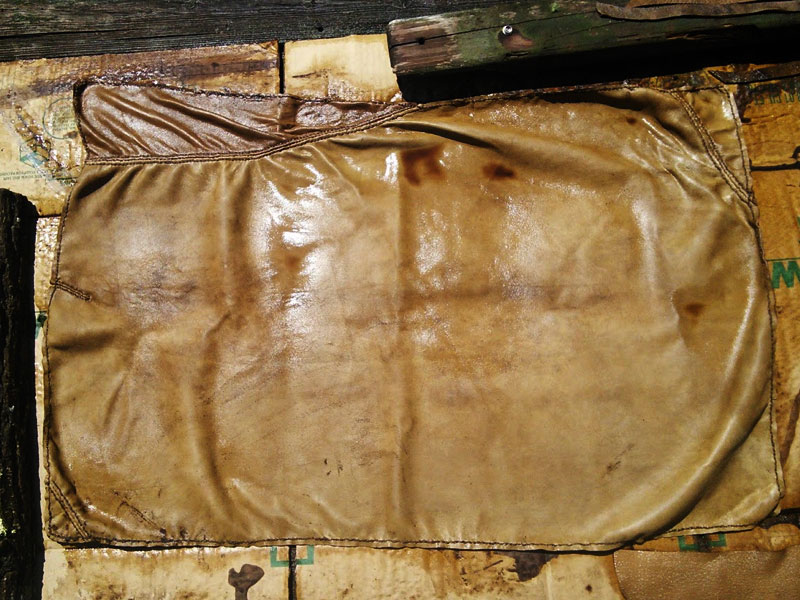
(here we see a pieced rectangle of goatskin getting its first suntan. In this case it's destined for a blanket cover, but the principle is the same.)

Your lining you'll cut the the same width as your leather, BUT leave it about 6" longer. We'll deal with that later.

Step Two - Placing, punching the stitch holes
Here is the first tricky part - there's a lot of stitching runs that aren't immediately obvious. 

For the spine, cut about twice as wide as you'll need, plus about 1/8" more to account for the fold. I say "about" because your measurements may vary with your materials - fiddle with your leather and your buckle to get the measurement right).

I'd also leave the spine about 3-4" longer than you need at this point and do the ends of the spine once almost everything else is in place. Again, thin leather stretches and compresses as you work it, and it's easy to lose or gain a quarter inch or more as you go. Doing the ends once everything else is more or less complete means less chance you'll end up having to deal with fixing a too-short spine later.

Once everything is cut, run your punching lines. I use a 5- or 10- prong "3.38mm Flat Leather Chisel" tool these days for thin leathers.

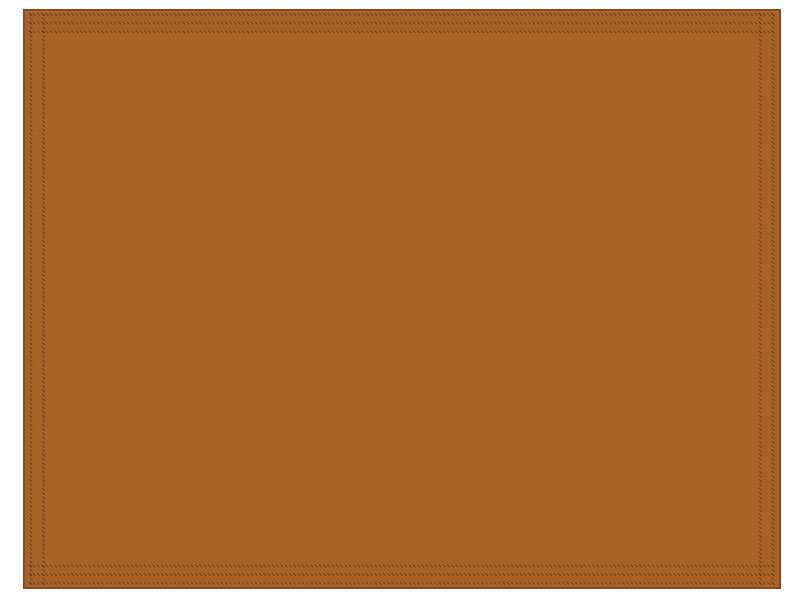
For the bag itself, you'll want three lines of stitching down the sides you'll sew up, and two lines each for the open ends. It will look like this:
merf-dunedain-snapsack-08-body-stiching-holes.jpg
merf-dunedain-snapsack-08-body-stiching-holes.jpg (33.24 KiB) Viewed 5476 times
Fiddle with your materials to work out the exact spacing, but here's approximately what I used:    

sewn edges: 1/4" apart, three rows each edge, 1/8" from edge
end edges: 3/4" apart, two rows each edge,  1/8" from edge

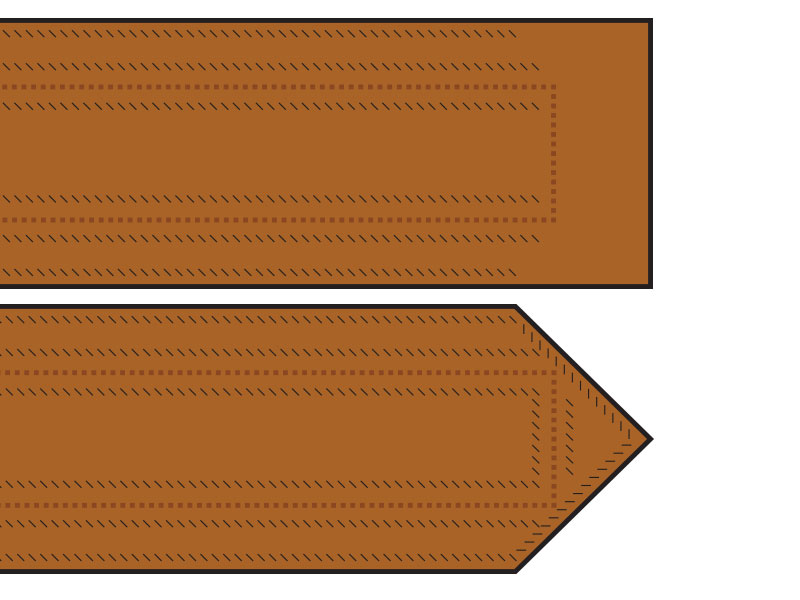
For the spine, you'll end up with three lines of holes down each side of the long axis. You'll then - once you're sure of your spacing - cut off the ends with ~45 degree corners and stitch the ends shut like this:

long edges: ~1/8" in from edge, 1/8" to next line, 3/16" to interior line.
merf-dunedain-snapsack-09-spine-stiching-holes.jpg
merf-dunedain-snapsack-09-spine-stiching-holes.jpg (69.29 KiB) Viewed 5476 times
(note - the top image is what you're doing at this point. Don't cut off the corners or punch the cross-spine stitches until you're a bit farther along.)
Last edited by Elleth on Fri Mar 03, 2023 7:02 pm, edited 1 time in total.
Persona: Aerlinneth, Dúnedain of Amon Lendel c. TA 3010.
User avatar
Elleth
êphal ki-*raznahê
Posts: 2933
Joined: Wed Nov 03, 2010 5:26 am
Location: in the Angle; New England

Re: The making of a Dunedain Snapsack

Post by Elleth »

Step Three - Stitching up the bag

The bag assembly step is pretty simple. First just saddle-stitch the long edges together, smooth (skin) side in / rought (flesh) side out. The important thing here that's easy to screw up - make certain you use the CENTER line of stitches for this.This is the last time you'll be able to get to this stitch, so make it good.
merf-dunedain-snapsack-10-main-body-stitched-center-line-holes.jpg
merf-dunedain-snapsack-10-main-body-stitched-center-line-holes.jpg (21.32 KiB) Viewed 5476 times
Then, tack down the edges of your center seam. You can turn the bag rightside out, or leave as is at this point - whatever's easier for you. You may also find that doing the main seam for a few inches, then tacking down the edges up to an inch or so of your seam before starting the main seam again is easier. Here's also where I tack down the ends of the bag. A single line of stitching works for this - you'll be over this place again before we're done:
merf-dunedain-snapsack-11-main-body-stitched-and-tacked.jpg
merf-dunedain-snapsack-11-main-body-stitched-and-tacked.jpg (34.63 KiB) Viewed 5476 times
For most of the body, a single thread of tacking is fine. I do double stitches at both ends and in three places along the body, like so:
merf-dunedain-snapsack-12-main-body-complete.jpg
merf-dunedain-snapsack-12-main-body-complete.jpg (25.78 KiB) Viewed 5476 times
This is for those pass-throughs under the spine, so we have a nice double row of stitching under there. 
Persona: Aerlinneth, Dúnedain of Amon Lendel c. TA 3010.
User avatar
Elleth
êphal ki-*raznahê
Posts: 2933
Joined: Wed Nov 03, 2010 5:26 am
Location: in the Angle; New England

Re: The making of a Dunedain Snapsack

Post by Elleth »

Step Four - Stitching up the spine

I first use a ladder stitch to close up the edges of the spine. This is using the outermost line of holes along both long edges. You want the edges of the leather to butt smoothly against each other here - this may take a bit of finessing. 
merf-dunedain-snapsack-13-spine-center-seam.jpg
merf-dunedain-snapsack-13-spine-center-seam.jpg (29.95 KiB) Viewed 5476 times
I then run a second tacking seam up each side between the inner two lines of holes to keep everything flat: 
merf-dunedain-snapsack-14-spine-side-stitches.jpg
merf-dunedain-snapsack-14-spine-side-stitches.jpg (27.61 KiB) Viewed 5476 times
Again, you may find it easier to run all these lines of stitching simultaneously, just to keep everything tacked in the proper place as you go. 

Just as with the bag body, I finish up the long stitches in three equidistant places along the middle:
merf-dunedain-snapsack-15-finishing-spine.jpg
merf-dunedain-snapsack-15-finishing-spine.jpg (15.06 KiB) Viewed 5476 times
(Note - in this image I portray the ends as finished. I'd suggest leaving the ends uncut and unpunched until  partway through the next step, when you're exactly sure of your dimensions.)
Persona: Aerlinneth, Dúnedain of Amon Lendel c. TA 3010.
User avatar
Elleth
êphal ki-*raznahê
Posts: 2933
Joined: Wed Nov 03, 2010 5:26 am
Location: in the Angle; New England

Re: The making of a Dunedain Snapsack

Post by Elleth »

Step Five - Connect spine to bag

Not we're starting to get something looking like a bag! Turn the bag body rightside out if it is not already. Match your centers, then start tacking the spine to the bag. Here's where those pre-stitched places come in handy - we leave a gap between spine and body in a few places along the bag so that we have a place to run our tie-down cords later.
merf-dunedain-snapsack-16-spine-fitted.jpg
merf-dunedain-snapsack-16-spine-fitted.jpg (164.91 KiB) Viewed 5476 times
Now that we know exactly how much space we have at the ends, cut the spine corners to length and stitch things together. I can't give you an exact measurement - just fold things in place, finagle a bit until you're sure, and cut. Since you'll have a ring under there, you may want to fit the spine just a *skosh* longer than the bag. Test for fit and see. 

I leave the ends free - we'll tack down the rings a bit later on.

Getting close!
merf-dunedain-snapsack-18-shell-mostly-complete.jpg
merf-dunedain-snapsack-18-shell-mostly-complete.jpg (124.15 KiB) Viewed 5476 times
Persona: Aerlinneth, Dúnedain of Amon Lendel c. TA 3010.
User avatar
Elleth
êphal ki-*raznahê
Posts: 2933
Joined: Wed Nov 03, 2010 5:26 am
Location: in the Angle; New England

Re: The making of a Dunedain Snapsack

Post by Elleth »

Step Six - Sew lining

This part is very similar to what you did stitching up the bag. First sew the bag itself together, then hem and tack down the loose edges. There's no need to do any fancy felling here - you'll never see the edges again once the bag is together, and this way everything lies flat. The one thing to be careful of is - of course - make certain when everything goes together, the tacked-down edges are against the leather. The lining looks "inside out" until everything is together, but that's just the way it works. 

Be sure to leave an extra few inches at the end for the reinforcement - that's next.
merf-dunedain-snapsack-19-lining-sewing.jpg
merf-dunedain-snapsack-19-lining-sewing.jpg (117.33 KiB) Viewed 5474 times
(shown is an earlier iteration that originally lacked the canvas reinforcement - pretend it's a few inches longer. The sewing technique is the same however.)
Persona: Aerlinneth, Dúnedain of Amon Lendel c. TA 3010.
User avatar
Elleth
êphal ki-*raznahê
Posts: 2933
Joined: Wed Nov 03, 2010 5:26 am
Location: in the Angle; New England

Re: The making of a Dunedain Snapsack

Post by Elleth »

Step Seven - add reinforcement to lining

Here's another one of those evolved improvements that isn't immediately obvious in the finished product. Cut a strip of heavy linen or hemp canvas about 1/2" inch wider than you want your cord slits to be - I use about 1.25." Then hem the edges, and fold it into place in the lining. This bit is more than a bit fiddly - it's a good place for pins or tacking stitches. The canvas should be completely encased in the lining when you're done:
merf-dunedain-snapsack-20-reinforce-lining-with-canvas.jpg
merf-dunedain-snapsack-20-reinforce-lining-with-canvas.jpg (33.31 KiB) Viewed 5474 times
(note how the raw edges of the lining are still to the OUTSIDE of the bag, as is the encased canvas strip. From the inside of the bag, you should just see the smooth surface of a single layer of linen)
Persona: Aerlinneth, Dúnedain of Amon Lendel c. TA 3010.
User avatar
Elleth
êphal ki-*raznahê
Posts: 2933
Joined: Wed Nov 03, 2010 5:26 am
Location: in the Angle; New England

Re: The making of a Dunedain Snapsack

Post by Elleth »

Step Eight - Stitch lining into bag

Almost there! Now at both ends of the bag we stitch the lining into place. If your bag is really wide you might want to do some tacking stitches along the spine as well, but that's not important for narrower bags - use your judgement here.

Step Nine - Fit rings and put final stitches in bag

Next fit your rings into place and stitch down the ends of the spine. Note how these stitches go through the leather, through the canvas, and through the lining. We want this to be sturdy. 
merf-dunedain-snapsack-21-ring-attachment.jpg
merf-dunedain-snapsack-21-ring-attachment.jpg (113.23 KiB) Viewed 5474 times
At this point it's a good idea to run another line of stitching just inside of the edge of the canvas to keep everything in place. This is an optional step, but I like the result -
merf-dunedain-snapsack-22-double-end-stitching.jpg
merf-dunedain-snapsack-22-double-end-stitching.jpg (137.72 KiB) Viewed 5474 times
Persona: Aerlinneth, Dúnedain of Amon Lendel c. TA 3010.
User avatar
Elleth
êphal ki-*raznahê
Posts: 2933
Joined: Wed Nov 03, 2010 5:26 am
Location: in the Angle; New England

Re: The making of a Dunedain Snapsack

Post by Elleth »

Step Ten - Cut and hem closure slits

This part's scary after all that work!

Mark where your slits or holes will be  -  you'll want an even number on each side, evenly spaced around the body. I space them this way - one on each side of the spine, about 3/16" out, and two matching opposite. Then I measure the space in between, and divide them up:
merf-dunedain-snapsack-23-slits.jpg
merf-dunedain-snapsack-23-slits.jpg (54.28 KiB) Viewed 5474 times
I strongly recommend making a paper copy here, just to make certain everything's where you want it. I end up with six slits on each aside, just under an inch apart - but don't trust my numbers. Measure yourself.

Once I'm sure I have everything placed, I cut my slits with a SHARP craft/x-acto knife. I cut from the leather side first to make sure my spacing is right, then push through the layers of fabric.My slits are ~3/4" long for my toggle cords - if you're just using a string, make eyelet holes instead.

Once everything is cut, I first do a quick tacking buttonhole stitch around all the layers of fabric, not bothering with the leather yet. This is partly to keep anything from fraying, and partly just to keep everything in place for the next step. 

Once all that's set, I do my final buttonhole stitches. I punch holes with a wider spaced ~3/16" stitching chisel for this, because I want to leave a bit more meat between my holes here. Then I complete the buttonhole stitch with my thicker linen thread. 

Once done, I rub down all my stitches, especially all the buttonhole stitching with beeswax.
Last edited by Elleth on Fri Mar 03, 2023 7:42 pm, edited 2 times in total.
Persona: Aerlinneth, Dúnedain of Amon Lendel c. TA 3010.
User avatar
Elleth
êphal ki-*raznahê
Posts: 2933
Joined: Wed Nov 03, 2010 5:26 am
Location: in the Angle; New England

Re: The making of a Dunedain Snapsack

Post by Elleth »

Step Eleven - fit the cords

We're there! Now just run your cords through the slits, under the spine and over the d-ring (this part can be really finnicky). If you have to skip going over the ring, that's not problem - just then make certain that your cord goes over the spine, so that the cord rather than the stitching takes all the weight. Either way, then lace the cords through the slits on the other side.

Now draw everything tight, and fit the "buttonhole" in your cord so that it keeps everything snug, but you have enough room to open it. Stitch the buttonhole closed.

And now you're done! Mount the sack to your quiver strap or whatever else, lace down your keepers if you so desire, and set off on your adventure!
merf-dunedain-snapsack-24-adventure.jpg
merf-dunedain-snapsack-24-adventure.jpg (175.41 KiB) Viewed 5474 times
Last edited by Elleth on Sat Mar 04, 2023 12:07 pm, edited 1 time in total.
Persona: Aerlinneth, Dúnedain of Amon Lendel c. TA 3010.
theguywitheyebrows
Wayfarer
Posts: 27
Joined: Sun Feb 19, 2023 3:47 pm
Location: Hobbs, NM, USA
Contact:

Re: The making of a Dunedain Snapsack

Post by theguywitheyebrows »

goodness gracious! you went full detail! your attention to detail is outstanding, i am going to have to reread this a buncha times before i get all the way there!! soo many thanks for all of that work, both designing the pattern for the bag and the grade A+ write-up!!
User avatar
Taylor Steiner
Haeropada
Posts: 976
Joined: Mon Apr 16, 2018 7:31 pm
Location: Great Falls Montana
Contact:

Re: The making of a Dunedain Snapsack

Post by Taylor Steiner »

Wow!
Frodo lives!
theguywitheyebrows
Wayfarer
Posts: 27
Joined: Sun Feb 19, 2023 3:47 pm
Location: Hobbs, NM, USA
Contact:

Re: The making of a Dunedain Snapsack

Post by theguywitheyebrows »

i have a leather worker mentor, bought one of them $100 chinese cobbler's stitching machines and we haven't had much luck getting it running. he bit the bullet (the nearest leather dealer's store got a new cute manager lady) and made a substantial new leather stitching machine purchase and i am feeling like that is going to be the way i go for this build. so many stitches!! does the spine run up the inside as well, like over top of the linen liner? i also like hand-peened copper&brass rivets for added durability, and see a few places where i'll add some like around the D's. do both ends have the drawstring setup or is one stitched shut? this is only the 4th time i've read through the pattern lol
Post Reply