Nockert Type 1 Pattern and Sewing Instructions: Difference between revisions
| Line 56: | Line 56: | ||
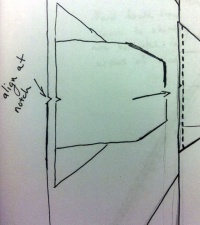
#Determine the top of the shoulder by folding the body of the tunic and marking the top of the fold. A standard way of making this mark is to cut a small notch at the fold. <br /> | #Determine the top of the shoulder by folding the body of the tunic and marking the top of the fold. A standard way of making this mark is to cut a small notch at the fold. <br /> | ||
#Do the same to determine the middle-top of the sleeve. <br /> | #Do the same to determine the middle-top of the sleeve. <br /> | ||
#:[[File:IMG 0014.JPG]] | #:[[File:IMG 0014.JPG|200 px]] | ||
#7. Match the notches on the sleeves, and sew them onto the body of the kyrtle with a back stitch and reinforce. <br /> | #7. Match the notches on the sleeves, and sew them onto the body of the kyrtle with a back stitch and reinforce. <br /> | ||
IMG_0013.JPG <br /> | IMG_0013.JPG <br /> | ||
*Ok, now all of your pieces are sewn together. We don't have far to go. <br /> | *Ok, now all of your pieces are sewn together. We don't have far to go. <br /> | ||
====Sew up the sides==== | ====Sew up the sides==== | ||
#8. Start about 3 inches up from the cuff edge, sew a line up from the sleeve, on down all the way to bottom of the skirt. Most of this can use a running stitch, you should use a back stitch in areas of great wear. Potential areas for back stitch would be elbow, arm pit, and waist. | #8. Start about 3 inches up from the cuff edge, sew a line up from the sleeve, on down all the way to bottom of the skirt. Most of this can use a running stitch, you should use a back stitch in areas of great wear. Potential areas for back stitch would be elbow, arm pit, and waist. | ||
Revision as of 23:20, 3 November 2016
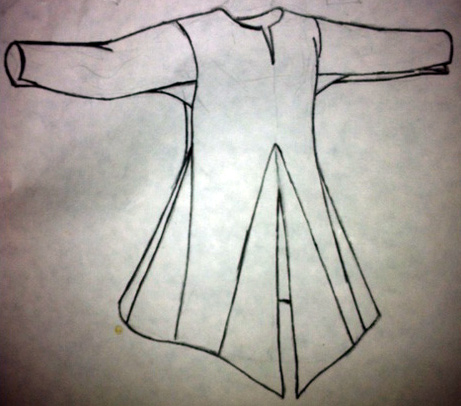
This is a good basic tunic that was used throughout Europe from 1000-1500. With simple modifications it can be made to have split skirts, or an angled bottom (like the leather jerkins of the Rangers of Ithilin in the Two Towers movie).
This pattern is based on the tunic of Bocksten Man, a bog find find from about 1300 in Sweden.
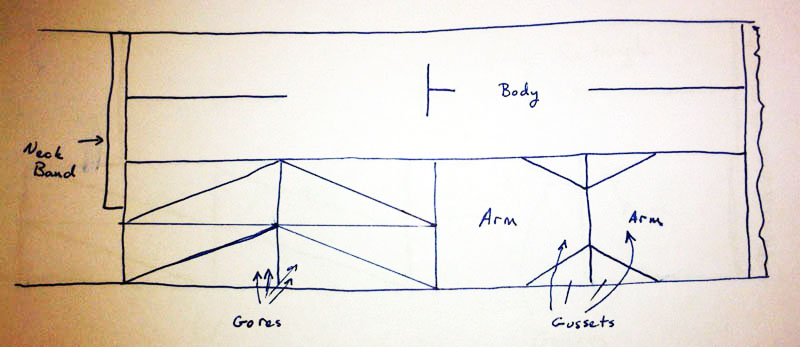
Sample cutting diagram for pattern
Cut the pattern
The body
- The body of the kyrtle is one piece without a shoulder seam.
- Measure the length of the kyrtle, mid-knee or thigh(?) to the shoulder, double it and add six inches.
- Measure around your widest part; chest, waist, hips, butt, whatever.
- Divide by two and add three inches.
- Depending on your height and girth and how long you wish to make it, it will be between 80" 100+" long and 20' -35+" inches wide.
- These two numbers are the rectangle of the body piece, cut 1.
The sleeve
- Measure from just over the top of your shoulder down to below your wrist.
- Measure your wrist, and around the widest part of your arm.
- Cut a rectangle from the two largest measurements.
- Take the measurement of your wrist, plus two inches and center it on one edge.
- Measure one hand span out and cut two triangles. this tapers your arm, and gives you gussets for more room while swinging swords at orcs.
Gores
- Measure from the bottom of where you want the tunic to be to just above your natural waist add four inches.
- Divide your widest part measurement by four.
- Cut four rectangles at these dimensions. Cut these on the diagonal, for eight right triangles.
- Cut two 8" x8" squares. These are underarm gussets.
- Cut two 2 inch-by-wrist-circumference rectangles.
- Cut a 2 inch by neck circumference plus 6 inches rectangle. These are for cuffs and neck hole.
The body
- Split the front and back for gores. Use the length determined in previous step to determine your split. (Bottom of Tunic to just above natural waist)
- Cut a hole for your head. Neck holes are their own special area, and I will cover them in their own post.
- If you are impatient, fold the body rectangle lengthwise, cut a line at the fold about the width of you head (ear to ear)then cut a little down on the front 2' -3 " this 'should' make a hole big enough to put your head through without ripping fabric. Don't force it!, if you need more cut down more than the 2".
- Congratulations, you now have cut out your pattern.
Sewing
- Sew the triangle gussets to the sleeve. This seam gets a workout. If you are hand sewing, use a back stitch and reinforce it.
- Sew the side gores to the torso. If you are hand sewing, a tight running stitch or a back stitch will work. once again reinforce.
Gores
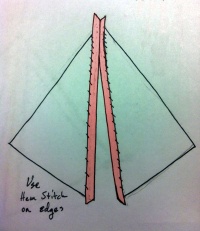
- Join the top several inches, or entire length of the front & back gores. This makes a diamond or triangle shape.
- Sew down the edges with a hem stitch.
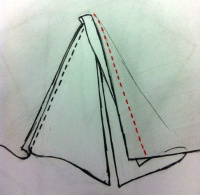
- Sew one side of the gore in. Remember, RIGHT SIDES TOGETHER!
- Sew in the gore to the split in the fabric.
- With right sides together, sew one side of the gore to one side of the split.
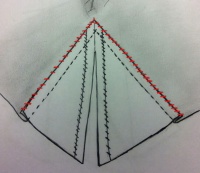
- Turn the material over, feed the edge through the split, and stitch.
- Reinforce with a hem stitch like shown here:
Add the arms
- Determine the top of the shoulder by folding the body of the tunic and marking the top of the fold. A standard way of making this mark is to cut a small notch at the fold.
- Do the same to determine the middle-top of the sleeve.
- 7. Match the notches on the sleeves, and sew them onto the body of the kyrtle with a back stitch and reinforce.
IMG_0013.JPG
- Ok, now all of your pieces are sewn together. We don't have far to go.
Sew up the sides
- 8. Start about 3 inches up from the cuff edge, sew a line up from the sleeve, on down all the way to bottom of the skirt. Most of this can use a running stitch, you should use a back stitch in areas of great wear. Potential areas for back stitch would be elbow, arm pit, and waist.
- Do this on both sides and reinforce.
IMG_0015.JPG
- There are still two more steps, but you now have a kyrtle that can be put on.
Hemming
- You have to hem the sleeve cuffs and the bottom of the skirt. I will explain hemming in more detail here.
Neck/collar
After hemming the last thing to do is the neck/collar. Here are several varieties, most are historically documentable.
The classic Keyhole neck
IMG_0016.JPG
Side hole, like the Coronation Gown of Otto IV
IMG_0018.JPG
V-neck, like the St. Louis Shirt.
IMG_0019.JPG
Side closing, I don't have documentation on this one. But it looks cool.
IMG_0017.JPG
I'm going to bump this to ask a general question that perhaps Taurinor or Udwin (maybe someone else) could answer (or Jack if he pops in)...in several posts, including the one in which the side seam from wrist to knees is sewn, the running stitch is recommended as a good choice, along with using the backstitch in areas of high wear. It also appears that we're just stitching two pieces of flat fabric together without folding them together or over on themselves to contain loose fibers/prevent fraying.
Will two loose edges running stitched together really hold okay, or do I need to fold them over each other first, and perhaps backstitch the whole thing, too?
Let's just say I'm paranoid, and don't trust a running stitch. Also, let's bear in mind I'll be needing this information for stitching linen outergarments, not wool, for the sake of my new climate.
I am a compulsive back-stitcher, but with long seams like that, the running stitch starts to look much more attractive. In a garment like a tunic, with a lot of ease, the side seams are there to hold the front and back of the tunic together -they're not really structural. If you like, you can put on your wool tunic and move around in it in front of a mirror. The only seams that I expect you'll see a lot of pull at are the ones holding the sleeves to the main body of the tunic and the ones in the armpit area.
With that being the case, a running stitch should be fine. What I like to do when I use a running stitch is put in a backstich every few inches, so if the running stitch does fail, the seam can only split a little ways before hitting a backstitch and stopping. Just make sure to make the stitches as small as you can, which is much easier on a thin fabric like linen than it is on wool.
To tuck away the raw edges, I'd suggest using a flat-felled seam, like so:
Fig 06.jpg
Use a running stitch for the first seam and either a running stitch or whip stitch for the second. This will contain the raw edges, and also add some strength to the seam. Just keep in mind that the second row of stitches will be visible on the outside of the garment, so use a thread you don't mind being seen.
Yup, ditto what he said ^ on all counts. For peace of mind, I generally just go ahead and use a backstitch & flatfell (2 visible lines of stitches) for most applications--everything from clothing to utilitarian foraging sacks. With linen, if your backstitch (or running stitch + backstitches) is tight/strong enough, you can also just 'overcast' the raw edges instead of the flatfell, which near as I can tell is just a whipstitch that isn't held down. It's a little less bulky than the flatfell. One technique I used for the inner seams of my breeches--where I didn't want to sit on the bulk of a flatfelled seam--was to first use a tight backstitch, press the allowance over, and then do a tight running stitch (about an 1/8th" in from the first seam) through all 4 layers of fabric with the raw edges overcasted.
“ Greg wrote: I'm going to bump this to ask a general question that perhaps Taurinor or Udwin (maybe someone else) could answer (or Jack if he pops in)...in several posts, including the one in which the side seam from wrist to knees is sewn, the running stitch is recommended as a good choice, along with using the backstitch in areas of high wear. It also appears that we're just stitching two pieces of flat fabric together without folding them together or over on themselves to contain loose fibers/prevent fraying.
Will two loose edges running stitched together really hold okay, or do I need to fold them over each other first, and perhaps backstitch the whole thing, too? Let's just say I'm paranoid, and don't trust a running stitch. Also, let's bear in mind I'll be needing this information for stitching linen outergarments, not wool, for the sake of my new climate.
Ok, this is old, and Taurinor and Udwin already answered the way I would. A flat fell is the way to go here.
that said... I was *assuming* a fulled wool which is quite a bit more fray resistant. For that I'd go with a reinforced stitch. But with linen, yeah, a flat fell all the way.
